
Automating the Emote Crossover industry with Rust
· Reading time: 16 mins
In this post, I will discuss advanced computer vision and statistical techniques at the service of what is arguably one of the most important aspects of social life during a global pandemic: silly emotes.
Who wants to constrain their communication avenues to the diktats coming from the Unicode Consortium, when you could instead enhance your vocabulary with obscure inside jokes, impenetrable to anyone outside a given narrow community? And even if you wanted that, who would waste a chance to write some Rust code? Certainly not me, dear reader.
(If you aren't familiar with how Twitch communities work and what Twitch emotes are, check this out).
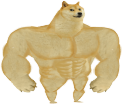
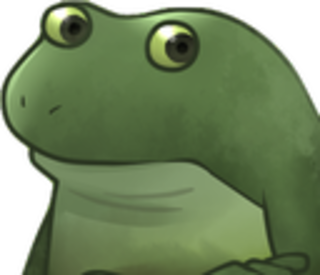
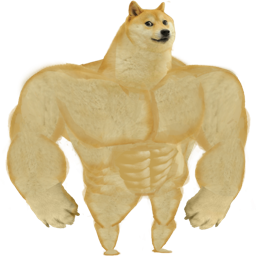
In the Souls speedrunning community, the hip trend in 2021 emote-based communication revolves mostly around this muscular fellow, SwoleDoge:
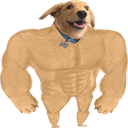
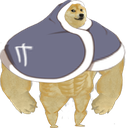
I contributed to this trend with my own creations, crossovers between the original swole doge and other emotes popular in the scene. I affectionately call them "the gang":
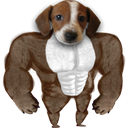
To create them, I would match SwoleDoge's color to my target emote's color, then I would just slap the latter's face on top of it. Simple task to do in basically any sufficiently powerful image editor.
Now, there are two skillsets which I deem important as a software engineer: pattern matching and laziness. No, I don't mean the functional programming idioms; I mean that I noticed a pattern of myself repeating the same picture editing behavior more than twice, and I decided I was too lazy to repeat that again.
So, to avoid wasting whole minutes by manually matching two pictures' colors, I decided it was well worth embarking on just a few weeks, a couple months tops of research in computational image manipulation. What you are about to read is the output of that research.
Brew some tea, wrap yourself up in your comfy blanket and let's get started!
Color spaces
The concept of what I wanted to achieve was simple: take two images, a source and a target, and produce a version of target which has the color distribution of source (in some lax sense of color distribution). Informally, if the source image is mostly green and the target image is mostly yellow, I want a version of target which is mostly green, too, so that I can then paste the source on the target's face without too much of a seam showing.
You may know that an image can be represented by specifying three channel values to mix together, and those three channels are most notoriously red, green and blue; this is the RGB color space. There are other color spaces, though, which may be more or less intuitive to work with, and exhibit better or worse properties for achieving certain outcomes. Spoiler: RGB is not a good color space to work with for our little project, so we'll have to look elsewhere.
This research paper has some very interesting ideas. The gist of it, to be super concise, is to take each channel of our target image, center it around the mean of the corresponding channel in the source image, and scale it by the quotient of the former and latter channel's standard deviation. In RGB space, this would mean:
$$ R_t^* = (R_t - \mathbb{E}(R_t)) \frac{\sigma(R_s)}{\sigma(R_t)} + \mathbb{E}(R_s) $$ $$ G_t^* = (G_t - \mathbb{E}(G_t)) \frac{\sigma(G_s)}{\sigma(G_t)} + \mathbb{E}(G_s) $$ $$ B_t^* = (B_t - \mathbb{E}(B_t)) \frac{\sigma(B_s)}{\sigma(B_t)} + \mathbb{E}(B_s) $$
Without going into too much detail, the XYZ color space works pretty okay for our use case, so we don't really need to convert all the way to the LMS and CIELAB color spaces. Another crucial factor is that our emotes are not photographs. They also have markedly different color distributions, not to mention an alpha channel for transparency, so the original paper's approach had to be revised slightly.
Rust implementation
Our project is made up of many array computations. Given that, we are going to use a recent nightly Rust toolchain: we need some features which still haven't made it to stable, but are pretty useful for speed and cleanliness purposes.
#![feature(array_chunks)]
#![feature(array_zip)]
We'll discuss them in the proper spots! For now, just trust me and
rustup default nightly
In most pouplar image formats, pixel values are usually stored as an array of four 8 bit integers, one per channel; hence, each channel has values ranging from 0 to 255. We want to map those to the real-valued $[0, 1]$ interval because it's more comfy to use. Here's how:
pub(crate) fn bytes2floats(rgba: [u8; 4]) -> [f32; 4] {
    let [r, g, b, a] = rgba;
    [
        r as f32 / 255.,
        g as f32 / 255.,
        b as f32 / 255.,
        a as f32 / 255.,
    ]
}

pub(crate) fn floats2bytes(rgba: [f32; 4]) -> [u8; 4] {
    let [r, g, b, a] = rgba;
    [
        (r * 255.) as u8,
        (g * 255.) as u8,
        (b * 255.) as u8,
        (a * 255.) as u8,
    ]
}
Most popular image formats use the RGB color space, so we want to write a couple functions to convert RGB into XYZ and vice versa. Luckily, we can achieve that via simple matrix multiplications.
pub(crate) fn rgb2xyz(rgb: [f32; 3]) -> [f32; 3] {
    #[rustfmt::skip]
    const M: [f32; 9] = [
        0.4124564, 0.3575761, 0.1804375,
        0.2126729, 0.7151522, 0.0721750,
        0.0193339, 0.1191920, 0.9503041,
    ];

    let [m11, m12, m13, m21, m22, m23, m31, m32, m33] = M;
    let [r, g, b] = rgb;

    [
        m11 * r + m12 * g + m13 * b,
        m21 * r + m22 * g + m23 * b,
        m31 * r + m32 * g + m33 * b,
    ]
}

pub(crate) fn xyz2rgb(xyz: [f32; 3]) -> [f32; 3] {
    #[rustfmt::skip]
    const MINV: [f32; 9] = [
        3.2404542, -1.5371385, -0.4985314,
       -0.9692660,  1.8760108,  0.0415560,
        0.0556434, -0.2040259,  1.0572252,
    ];

    let [m11, m12, m13, m21, m22, m23, m31, m32, m33] = MINV;
    let [x, y, z] = xyz;

    [
        m11 * x + m12 * y + m13 * z,
        m21 * x + m22 * y + m23 * z,
        m31 * x + m32 * y + m33 * z,
    ]
}
In general, we are going to try to be mindful of heap allocations in this project, and use arrays instead of Vecs wherever we know beforehand (i.e. at compile time) all the sizes we are supposed to work with.
While we're at it, let's also implement a thresholding function that will make all pixels below a certain transparency black and fully transparent. This will help with cleaning up images a bit and reducing noise. It's an assumption that we can make by virtue of what most emotes look like: a lot of transparency around the borders, a lot of color in the middle.
pub(crate) fn threshold_alpha<const T: u8>(rgba: [u8; 4]) -> [u8; 4] {
    if rgba[3] < T {
        [0u8; 4]
    } else {
        rgba
    }
}
Clustering image colors
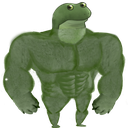
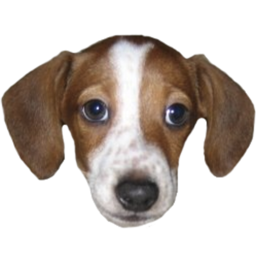
The attentive reader may have noticed that in most images the body is made up of more than one dominant color; the froge, for example, has two shades of green, and FrankerZ has a part white, part brown head.
The intuitive concept of "FrankerZ is made of a white part and a brown part" can be modeled with the statistical technique of clustering. Clustering algorithms take points in an $N$-dimensional vector space and arrange them in $K$ groups according to a given measure of similarity. In a color space, points that are close together translate to colors that are similar to each other, so clustering pixels of an image according to their closeness means that we can build $K$ groups of pixels of similar colors.
A very popular clustering algorithm is K-means. It is an iterative algorithm that partitions our data points in $K$ groups, and at each iteration the variance in each group decreases towards a local minimum. We start with an initial estimation of $K$ centroids, one per group. At each step, we first assign each point to the group of its closest centroid, and then we update the group's centroid to be the mean of the points currently belonging to it.
Rust implementation
The algorithm in Rust looks elegant and concise, and it is also reasonably fast, if I say so myself! Again, we leverage all the compile time computation we can: we use const generics so we can implement the algorithm for arbitrary-sized vector spaces and arbitrary number of partitions $K$ with constants instead of variables. This makes the optimizer pretty happy because it can make all sorts of assumptions.
We also use the array_zip unstable feature in some places. This allows us to avoid the .iter() notation in some awkward spots and supposedly also makes the optimizer all warm and fuzzy -- and I mean, I'm happy too if I can just cough up some unrolled assembly loops while using high level functional constructs.
pub(crate) struct KMeans<const K: usize, const D: usize> {
    pub(crate) means: [[f32; D]; K],
    pub(crate) labels: Vec<usize>,
}

pub(crate) fn distance<const D: usize>(a: &[f32; D], b: &[f32; D]) -> f32 {
    a.zip(*b).map(|(a, b)| (a - b).powf(2.)).iter().sum::<f32>()
}

pub(crate) fn k_means<const K: usize, const D: usize, const ITERS: usize>(
    points: &[[f32; D]],
) -> KMeans<K, D> {
    let mut centroids = k_means_init(points);
    let mut labels = Vec::with_capacity(points.len());

    for _ in 0..ITERS {
        let mut labels_hist = [0usize; K];
        labels.clear();
        labels.extend(points.iter().map(|p| {
            let label = centroids
                .iter()
                .map(|c| distance(c, p))
                .enumerate()
                .fold((0usize, f32::MAX), |(label, distance), (l, d)| {
                    if d < distance {
                        (l, d)
                    } else {
                        (label, distance)
                    }
                })
                .0;
            labels_hist[label] += 1;
            label
        }));

        let labels_weights: [f32; K] =
            labels_hist.map(|h| if h == 0 { 0. } else { 1. / (h as f32) });

        centroids = [[0f32; D]; K];

        labels.iter().enumerate().for_each(|(i, &l)| {
            for d in 0..D {
                centroids[l][d] += points[i][d] * labels_weights[l];
            }
        });
    }

    KMeans {
        means: centroids,
        labels,
    }
}
Let's go over this code step by step. First of all, we define a data structure that will be the output of our computation. For finding $K$ means in a $D$-dimensional space, the function will return an instance of KMeans<K, D>. For example, if we want 4 clusters of 3-dimensional RGB colors, we will have a KMeans<4, 3>. We also want to return the label of each pixel, i.e. the index of the mean of the cluster it belongs to. We will store that in the labels vector; yes, we will reluctantly have to resort to the heap for this.
pub(crate) struct KMeans<const K: usize, const D: usize> {
    pub(crate) means: [[f32; D]; K],
    pub(crate) labels: Vec<usize>,
}
We also need a simple Euclidean distance function:
pub(crate) fn distance<const D: usize>(a: &[f32; D], b: &[f32; D]) -> f32 {
    a.zip(*b).map(|(a, b)| (a - b).powf(2.)).iter().sum::<f32>()
}
Our $K$-means function accepts an array of points of given dimensionality D, and returns an instance of KMeans<K, D>. We preallocate the vector space we know we need (we can't use an array, as we don't know how much space we need at compile time) and initialize the centroids (more on this later). We also specify a const generic for the number of iterations.
pub(crate) fn k_means<const K: usize, const D: usize, const ITERS: usize>(
    points: &[[f32; D]],
) -> KMeans<K, D> {
    let mut centroids = k_means_init(points);
    let mut labels = Vec::with_capacity(points.len());
    for _ in 0..ITERS {
The iteration step works by writing into the preallocated labels vector the label of the closest current centroid for each pixel. This evaluation happens inside the call to fold(), where each centroid is compared with the pixel we are currently iterating over, and the centroid with the smaller distance is passed through. We also keep tabs on how many instances of each label we have found, by incrementing the labels_hist array's entry corresponding to the label we just found.
let mut labels_hist = [0usize; K];
labels.clear();
labels.extend(points.iter().map(|p| {
    let label = centroids
        .iter()
        .map(|c| distance(c, p))
        .enumerate()
        .fold((0usize, f32::MAX), |(label, distance), (l, d)| {
            if d < distance {
                (l, d)
            } else {
                (label, distance)
            }
        })
        .0;
    labels_hist[label] += 1;
    label
}));
Now we need to compute the new centroids. Recall that the mean is computed as
$$ \mathbb{E}(x) = \sum_{i=1}^{N} \frac{x_i}{N} $$
For each cluster, our $K$ is the number of points in the cluster. We stored that value in the histogram array label_hist, so we can simply take that value for each of the $K$ clusters and compute its inverse.
let labels_weights: [f32; K] =
    labels_hist.map(|h| if h == 0 { 0. } else { 1. / (h as f32) });
Finally, we reinitialize the centroids to zero, and compute the above weighted summation:
centroids = [[0f32; D]; K];

labels.iter().enumerate().for_each(|(i, &l)| {
    for d in 0..D {
        centroids[l][d] += points[i][d] * labels_weights[l];
    }
});
Initialization
The output of $K$-means largely depends on the choice of starting centroids. The naïve way of doing that is just choosing random points in our vector space, or sampling random points from our observations (i.e. taking one of the actual pixels at random). These initialization methods are suboptimal, though, and tend to be inconsistent. We can rely on the K-means++ algorithm for a reliable initial guess. It works by choosing a (possibly random) pixel value as our first centroid and then, for each of the other $1..K$ centroids, choosing the pixel which has the maximum distance from its closest centroid. It's kind of a mouthful, I know.
In our implementation, we take the center pixel as first centroid, because we assume it's going to have a color we're interested in, and then we go from there.
fn k_means_init<const K: usize, const D: usize>(
    points: &[[f32; D]]
) -> [[f32; D]; K] {
    let mut centroids = [[0f32; D]; K];

    centroids[0] = points[points.len() / 2];
    for i in 1..K {
        centroids[i] = points
            .iter()
            .fold(([0f32; D], 0f32), |farthest, cur| {
                let closest_centroid = centroids[0..i]
                    .iter()
                    .fold(([0f32; D], f32::MAX), |closest, centroid| {
                        let dist = distance(cur, centroid);

                        if closest.1 < dist {
                            closest
                        } else {
                            (*centroid, dist)
                        }
                    })
                    .0;

                let dist = distance(&closest_centroid, cur);

                if farthest.1 > dist {
                    farthest
                } else {
                    (*cur, dist)
                }
            })
            .0;
    }

    centroids.reverse();
    centroids
}
The results
Here's what all the above shenanigans look like on FrankerZ and ConcernFroge, with $K = 3$.
Color transfer
Let us now implement the modified color transfer algorithm we mentioned before. We assume that our inputs are flat vectors of 8-bit RGBA pixels, one for our source and one for our target (or destination) image:
let src_data: Vec<u8> = vec![r, g, b, a, r, g, b, a, ...];
let dst_data: Vec<u8> = vec![r, g, b, a, r, g, b, a, ...];
We reshape those into vectors of four single-precision floats, thanks to the magic of array_chunks(), which is the other unstable feature we opted into. This allows us to have vectors of arrays of a known size. Guess who's going to be happy about that? Yeah, exactly, our good friend the optimizer! But also us, because we won't have to sort-of manually do unnecessary bounds checking and weird iterations, and we can just destructure arrays in the code instead, which looks a lot cleaner. We can't do everything at compile time and on the stack, though, so we're going to cave in and allocate a little bit of memory on the heap.
let src_data_xyza: Vec<[f32; 4]> = src_data
    .data()
    .as_slice()
    .array_chunks::<4>()
    .copied()
    .map(threshold_alpha::<200>)
    .map(bytes2floats)
    .map(rgba2xyza)
    .collect();

let dst_data_xyza: Vec<[f32; 4]> = dst_data
    .data()
    .as_slice()
    .array_chunks::<4>()
    .copied()
    .map(threshold_alpha::<200>)
    .map(bytes2floats)
    .map(rgba2xyza)
    .collect();
All that's left for us to do is to compute our $K$ means for our source image and apply the transformation to the target image. We subtract the target mean and add back the source mean to each channel except the alpha -- we're okay with it just being unchanged, as we've already cleaned it via the thresholding function.
let src_means = k_means::<3, 4, 10>(&src_data_xyza);
let dst_means = k_means::<2, 4, 10>(&dst_data_xyza);

for src_mean in src_means.means {
    let output = dst_data_xyza
        .iter()
        .copied()
        .enumerate()
        .map(|(idx, mut dst_color)| {
            let label = dst_means.labels[idx];
            let dst_mean = dst_means.means[label];
            for i in 0..=2 {
                dst_color[i] = dst_color[i] - dst_mean[i] + src_mean[i];
            }
            dst_color
        })
        .map(xyza2rgba)
        .flat_map(floats2bytes)
        .collect::<Vec<_>>();
}
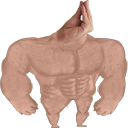
You may have noticed we also clustered the target image in two partitions. This is because, as I mentioned earlier, emotes generally have a lot of transparency around the edges and a lot of color in the center, and averaging all of it is going to look bad (the transparent color actually counts as black, mostly). We apply the transformation to each destination pixel against the mean of its own cluster; ideally, the more destination clusters, the more refined will be the resulting transformation, up to a point where the clusters will be too similar to each other and we start getting weird results. Two destination clusters work just fine for target images without a lot of color variations, like our SwoleDoge.
With that for loop, we output a modified image for each source centroid, so we can just overlay them into shape later. You'll notice that one of the output images is useless and mostly black -- that's because its source cluster is made of black transparent pixels.
The final result
Okay! It is now time to put everything together. These two are, respectively, our source and target emotes:
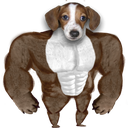
Let's mash them up! Here's the result:
Impressive, right? Granted, we haven't mounted any head on top of any other head, but that's an entirely different matter and probably another couple months' worth of research, so I think I'll let that go for the time being.
"Yeah but, like, dude, why is it always Rust"
Well, yeah, you're right, I could've just whipped up a Jupyter notebook, scipy, numpy and Pillow and been done with it for a while already. And I did that indeed for prototyping all of this and it was fantastic in its own way. But. I chose Rust because after spending almost my entire career dissatisfied with programming languages and their ecosystems, I have finally found one that genuinely makes me happy and cares deeply about all the things I care deeply about -- cleanliness, correctness, performance, maintainability, you name it -- for things I'm meant to run in production.
And oh.
There's something else, I almost forgot.
You can run very complex stuff on the web in the blink of an eye with it.
Don't believe me? Okay then, try this. Take an emote from somewhere, download it, then come back here and scroll up a bit. Take the emote you just downloaded and drag it over either FrankerZ or SwoleDoge. Go ahead. I'll wait!
Conclusions
Thank you for the time you chose to spend reading this. I'm glad you did and I hope you enjoyed it!
A special thank you to Spacey, whose help in editing this post was invaluable.
If you want to check out the project's code, you can find it on my github. If you have questions or want to chat, feel free to DM or mention me on Twitter!
Till next time. Take care!


